

Set the round pieces of dough in a hot skillet in the morning, and for a while nothing much happens. The white corn flour slowly takes in the heat and starts to dry from the edge. Then, after about 5 minutes, the sweet scent of roasted corn fills the kitchen. This is the arepa, the round corn bread baked every day on Venezuelan tables. It comes out crisp and thin outside and tender and crumbly inside, and you split it from the side and fill it with as much cheese, chicken, beef, beans, and avocado as you like.

The Venezuelan Arepa and Its History
An everyday staple
The arepa is eaten mainly in Venezuela and Colombia, and it counts as a national food in both. In Venezuela it shows up at every time of day. Mornings bring arepas with cheese, lunch brings them with meat, and late at night they come with beans. Stalls fry them and home cooks bake them. Press the same dough thin and fry it, and you get the breakfast-stall Venezuelan empanada.
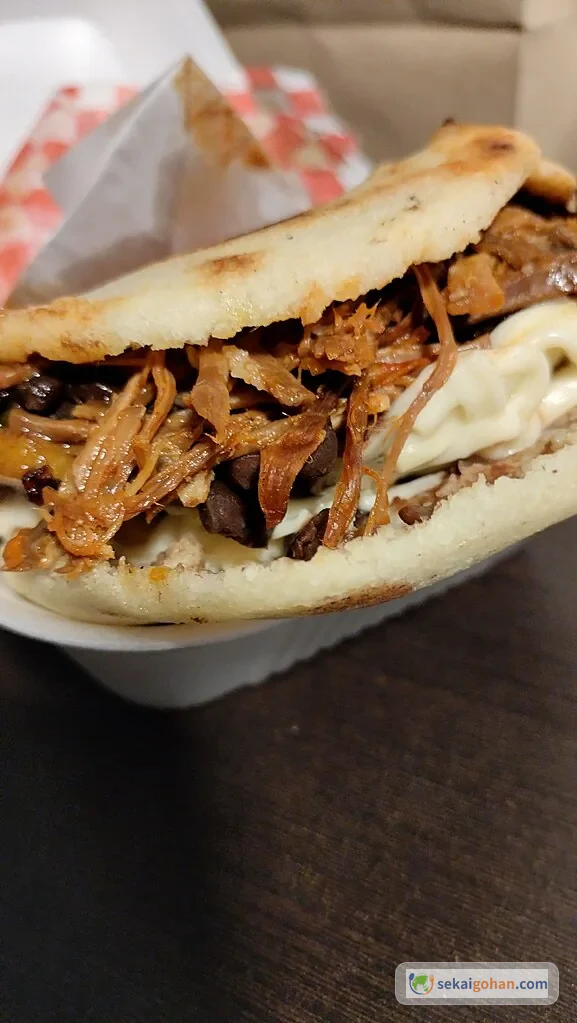
When an arepa shop opens on a Caracas morning, ordering starts with what to stuff it with. The fillings have names: reina pepiada, with chicken and avocado; domino, with black beans and white cheese; pelúa, with shredded beef and yellow cheese. Making the Venezuelan style at home means doing both parts, the dough and the split-and-stuff way of eating it.
The South American cuisine overview (in Japanese) covers plenty of meat dishes and stews, but with the arepa you're making the staple itself. Hearty plates like Brazilian churrasco or Colombian bandeja paisa take planning. Arepas let the eggs, cheese, chicken breast, and avocado already in your refrigerator become that day's meal.

From hot stones to bagged flour
The arepa goes back to northern South America before Europeans arrived. Indigenous people who grew corn crushed the kernels, kneaded them with water, shaped them into rounds, and baked them on hot stones or clay plates. Softening dried corn, removing the hulls, and grinding it was heavy work.
Things changed in the mid-20th century, when precooked corn flour spread. With a flour like the well-known "Harina P.A.N.," a household needed only water and salt to make dough, and the arepa took off as home cooking across Venezuela. Masarepa is the flour that made that old, laborious process simple.

Venezuelan and Colombian arepas
The same name covers very different ways of eating. Colombia has many regional types, including cheese-filled, egg-filled, thin-baked, and sweet-corn arepas, and many are served with cheese or butter. The Venezuelan arepa is closer to a pocket for filling, a full meal in your hand like a sandwich. Set it beside the Colombian arepa and you can see how the same corn dough is served alongside a meal in one country and stuffed in the other.
If salteña is a dish that wraps soup, the arepa wraps whatever is on the table. A dough of just flour, water, and salt takes any filling you have. South American cooking tends to catch the eye with spices and big cuts of meat, but an everyday staple like this one brings you much closer to how people actually eat.
An arepa abroad
That flexibility has also made the arepa a strong immigrant dish. For Venezuelans living abroad, a bag of masarepa carries memories of the family table. More and more arepa shops are opening in cities in Spain and the United States, and ordering a "reina," a "domino," or a "pelúa" at one of them is a small piece of a Venezuelan kitchen carried far from home.
Ingredients (makes 8)

A basic arepa uses very few ingredients, so the flour and the water amount decide the result. Before making fancy fillings, aim for a dough that is moist inside when split and only lightly toasted on the surface.
Basic arepa dough comes from corn and uses no wheat, but production-line labeling differs by product. The fillings use chicken, egg, and dairy. Check allergen labels on store-bought mayonnaise, cheese, and cooked chicken.
Choosing Masarepa and Other Arepa Essentials
Everything depends on masarepa (harina precocida), a precooked corn flour. Look for a bag labeled pre-cooked corn meal / harina precocida / masarepa. Other corn products won't do the job. Cornstarch is only starch. Corn grits and polenta are too coarse to form a dough. Mexican masa harina is nixtamalized, a different process that changes the aroma and texture. With the wrong flour, the dough won't hold together or turns out floury, so read the label carefully.

Ordinary supermarkets rarely carry masarepa. Look at import grocers, South American grocers, and online shops under "Harina PAN," "masarepa," or "arepa flour," and order it before the day you plan to cook. One bag makes many batches. If you're unsure what to buy, start with three things: a white Harina P.A.N.-type flour, a heavy skillet with a wide cooking surface, and a thermometer. You can't reliably tell by eye whether boiled chicken breast is cooked through, and the thermometer settles it before you cool and mix the reina pepiada filling.
If you have to make arepas today, fine cornmeal soaked in boiling water and left to absorb it for longer gets close in shape. It won't have the moist, tender inside when you split it, though. For your first batch, order the proper flour.
Method
Arepas need almost no fermenting or resting. But rest the dough a few minutes rather than baking right after adding water; it lets the flour absorb the water and makes cracking less likely. The steps below follow this flow: mix the flour into water and salt, knead, rest briefly, and shape.
If it cracks badly when shaping, it lacks water. Masarepa absorbs differently by maker and storage. You don't need so much water that it sticks to your hands, but if pressing the edge produces fine cracks, add 1–2 tsp of water and knead again.
Common Arepa Problems and Fixes

Most dough problems come from adding the water too fast. Hold some back at the start. Masarepa absorbs water within a few minutes, so a dough that feels soft at first will firm up. Judge the firmness after a 5-minute rest.
Thickness decides how the arepa splits. Thin ones cook fast but tear when you open them from the side, and very thick ones stay floury in the center. For stuffing Venezuelan style, aim for about 0.5 inches (1.5 cm). If the skillet alone doesn't cook them through, finish them in the oven.
Color can fool you. The surface may be deeply browned while the inside is still damp, and a damp arepa collapses when you put a knife in. Tap it lightly with a finger. A dry, light sound means it's done.
Serving, Fillings, and Storage

Reina pepiada
Reina pepiada is the classic Venezuelan filling of chicken, avocado, and mayonnaise. The name refers to Susana Duijm, Miss World 1955. Store-bought cooked chicken turns it into an easy weekday lunch, but it can be salty, so use a little less mayonnaise and brighten it with lime juice.
Domino
Domino is the combination of black beans and white cheese, named for the black-and-white look of a domino tile. Warm canned black beans with a little cumin and salt, then add shredded melting cheese or mozzarella. It's satisfying without any meat. Skip strong blue cheese, which overwhelms the sweetness of the dough. Mozzarella is the best choice, then feta, then cottage cheese.
Pelúa
Pelúa is shredded beef with yellow cheese. Slow-stewed beef is the authentic version. At home, thin beef strips sautéed with onion, cumin, and paprika come close. Meat lovers can also fill the next day's arepas with leftover shredded meat from Cuban ropa vieja.
Breakfast arepa
A breakfast arepa is made with butter, cheese, and a fried egg. Spread butter thinly on a fresh arepa and tuck in a soft egg. The sweet corn mixes with the yolk, and even on a busy morning it feels like you've properly cooked.

Fusion fillings
For a Japanese-style arepa, tuna-mayo, kinpira, teriyaki chicken, and shiso go well. The arepa takes almost any filling. Bake a batch in place of white rice, stuff them with refrigerator leftovers, and they easily become a habit.
Making ahead and storage
Arepas also suit making ahead. Cool baked ones completely, wrap each in plastic wrap, and store them for 2 days in the refrigerator or put them in a freezer bag and freeze for 2 weeks. Freeze only the plain baked dough. Filling makes it soggy and likely to fall apart, so add the filling just before eating. To serve, thaw at room temperature and crisp the surface again in a skillet or toaster, since the microwave alone won't bring back the toasty outside.
FAQ
The dough is sticky and I can't shape it.
There's either too much water or the rest was too short. Let it sit 5 minutes to absorb first. If it still sticks badly to your hands, add masarepa 1 tbsp at a time. If the edges crack badly instead, the dough needs more water.
Can I make them without an oven?
Yes. After browning both sides in the skillet, cover it and cook over medium-low heat until the center is done.
What menu does it go with?
For a light meal, serve arepas with salad. For a heartier one, fill them with black beans, egg, cheese, and chicken. To build a South American table, try ceviche as an appetizer, churrasco for meat, and feijoada for beans. It's a fun way to taste the regional differences.